The very short guide is: Download StereoPhoto Maker, open the image, display side-by-side mirrored left, get a mirror, hold it between your eyes and the gap between the two images with the mirror side to the left, look at the right image, adjust the mirror so that the virtual left image matches the position of the right image. Use the opposite directions (mirrored right, mirror side to the right) if your left eye is more dominant. For more detail, see the Basics and Mirror Techniques sections.
Contents
Among many options and controls, there are only a few that are important for simple image viewing. The first step is to open a stereo image or separate left/right images through the File menu or the respective icon. The most common stereo image format is the "MPO" format (multi picture object).
One important option is whether to use smoothing or not
(Menu bar: View - Resampling).
In general, smoothing should be active, especially with
"low resolution" LCD screens.
The most important controls are the arrow keys:
Up/down for adjusting height differences,
and left/right for setting the stereo window.
Holding down
the SHIFT key while pressing the arrow keys will adjust in single
pixel steps.
Other controls: ENTER to switch between full screen and window,
f to fit the image,
j for actual size,
F2/F3 for zooming in/out,
SPACE for next image,
BACKSPACE for previous image.
Those who have access to a "native" 3D display device should now be able to directly display the images to the device, or at least to convert the image to a format compatible with the display using SPM.
Without a special display device, there are many alternative options. There is no "best" way, some viewers will feel more comfortable with one method, while other viewers prefer another option.
The viewing methods can be split in two groups: Direct viewing techniques and techniques involving viewing aids.
There are two direct viewing techniques: Cross-eyed and parallel view. Although these techniques are recommended by many people, I would strongly discourage from trying to practice either of these methods. If you don't succeed in less than a minute, try a method with viewing aids first.
The human eyes are trained to link focus distance and convergence. Many people succeed in looking cross-eyed, but for "parallel" viewing, only very few people succeed in positioning the eyes wider than parallel. This means that in general, parallel view is limited to images with a width equal to the eye distance. For the untrained viewer, either of these viewing techniques can cause serious problems switching back to normal view. Even after a few minutes of "odd" viewing, it can take hours to get back full regular eyesight.
If you still want to continue without viewing aids, start with a small image size. For cross-eyed viewing, the left image must be at the right, and the right image must be at the left (swapped). For parallel view, the images are not swapped.
|
|
|
| Cross-Eyed | Parallel View |
With both techniques, you will see three images, where only the center image is "stereo", the outer two images appear due to the fact that you see both images with both eyes. With prallel view, you can hold a piece of paper between the two images to avoid seeing the "outer" images.
The most common viewing aids can be split in three categories: Mirrors, color filters and optics.
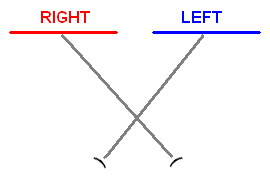
The most simple viewing technique is using a single mirror, but it requires a little patience and skill to align the mirror properly. The images have to be displayed side-by-side with one of the images mirrored. The mirror is placed between the eyes and the gap between the two images, with the mirror surface towards the mirrored image. Both eyes look at the image opposite to the mirror surface. Like this, the direct looking eye sees the regular image, the other eye sees the mirrored version of the mirrored image. The mirror has to be adjusted to position the "virtual" image as close as possible over the true image seen with the other eye.
This technique is not suitable for relaxed viewing over a longer period, but it is a very simple way to get the full sensation of stereoscopic viewing, once the mirror is properly aligned.
 |
 |
 |
||
| Single Mirror | Two Mirrors | Four Mirrors |
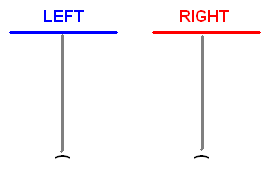
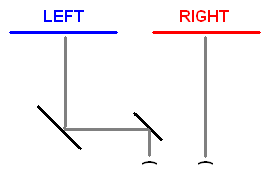
The next step is using two mirrors for one eye, with direct view for the other eye. The images have to be displayed side-by-side in normal orientation (non-mirrored).
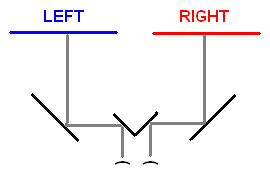
The best way is to use a four mirror arrangement with one mirror 45° in front of each eye, and another pair of adjustable mirrors at the sides. This setup allows fully relaxed viewing of images of any size from small prints to large scale projection. Although this is the best way to view side-by-side images, there seems to be no proper commercial product available.
A well known technique are the red/green glasses, or similar color filters. However, the colors of the image source and the filters must match to give good separation. While this can be used for grayscale images with good success, the reproduction of images with arbitrary colors is very limited.
The optical systems can be divided in two categories: Lens glasses and prism glasses. The lens based glasses help with focusing when using parallel view, and are only suitable for very small high resolution prints. The prism glasses are available for side-by-side or above/below viewing, and are suitable for image sized up to about 13x18cm. In general, side-by-side is used for portrait orientation, above/below for landscape orientation. Usually, the optical aids have a magnifying effect, and are therefore not suitable for low resolution LCD screens.
Autostereoscopic displays are usually only available at smaller sizes and higher prices. Depending on the actual implementation, the viewing distance and position can be very limited.
For sequential displaying, the device only has to support the higher refresh rate. However, each viewer must have appropriate shutter glasses that are kept in sync with the display. Currently, the shutter glasses are still expensive. Another drawback is that the shutter frequency can interfere with artificial light sources, leading to flicker.
For polarized displaying, the glasses can be very cheap to affordable,
depending on whether a carboard, plastic or metal frame is used.
However, the type and orientation for left and right side must match
that of the display device.
For projection, either two separate projectors can be used,
or a single DLP projector with combined polarizing/color wheel.
Most direct view devices use line interlaced polarizing.
The viewing distance and the vertical viewing position and angle
can be very limited, but the displays are still cheap to affordable.