FujiFilm Real 3D W1/W3
External Flash Unit
This article describes how to use an external flash unit
with the
FujiFilm Real 3D W1
or
FujiFilm Real 3D W3 cameras.
Built-in flash
The specifications give a flash range
of 3.7m (wide angle) to 3.3m (telephoto) for the W1,
and 3.6m (wide angle) to 3.1m (telephoto) for the W3.
That sounds good, but the values are calculated for
a sensitivity of ISO 800 and open aperture.
In other words:
You get half the range at ISO 200
(the highest acceptable setting for these cameras),
not to speak about
the range at ISO 100 with a maximum range of 1.3m.
The figures calculate into an average
guide number of about 4.7.
Advantages of an external flash unit
The poor guide number of the internal flash is the main reason
for using an external flash.
Using aperture settings of F5.0/F5.6 at ISO 100
helps a lot to improve the image quality.
But other benefits of an external flash
are a reduced red-eye effect and the elimination of
the "dust spot" phenomenon, which is
very annoying in stereo photography.
Attachment
There is no hot shoe or any other
accessory shoe.
At least there is a tripod mount thread, where a
flash bracket can be attached.
Triggering
The cameras are not designed to be used with an external
flash unit, there is no PC sync socket, either.
The external flash has to be triggered optical
from the built-in flash.
A serious drawback is the metering pre-flash
that can't be turned off. This means that
the optical trigger must have the option to ignore the
metering pre-flash, and fire along with the main flash.
There is no possibility of
setting or adjusting the flash output level, either.
The internal flash will fire at full power in most cases,
leading to a long flash recycle lag between two shots -
not to speak of the unnecessary battery drain.
This is a serious pain with the 3D W3 model
and its small battery.
Camera Settings
The only good point is that
the FujiFilm Real 3D W1 and W3
cameras offer full manual mode where sensitivity,
aperture and shutter time can be set.
The sensitivity can be set to ISO 100, 200, 400, 800 or 1600
(full stops),
where only ISO 100 and ISO 200 give more or less
"acceptable" image quality.
The cameras have only three aperture settings:
F3.7/F5.0/F8.0 at full wide angle and F4.2/F5.6/F9.0
at normal and telephoto zoom.
This calculates to 5/6 stops between open and medium aperture,
1 1/3 stops between medium and closed aperture, and
1/3 stop difference between wide angle and medium/telephoto zoom.
Only the shutter speed can be set in 1/3 stops
from 1/2s to 1/1000s.
Unfortunately,
there is no custom white balance mode, so the
white balance must be set to daylight to approximately
match the white balance of the flash.
Of course, this only applies if there are
no gel filters used in front of the flash head.
A suitable flash unit must either support a
full manual mode, where the output power can be set
to a specific value, or support an auto mode with
a built-in metering sensor.
Slave Flash Units
There are some "digital slave" flash units
available with built-in pre-flash suppressing optical
trigger and metering sensor. For a start, I chose the
Bilora Digital-B D 22 iS intelli flash 120.
The only reason for using this model was the fact that
thought it would be really cheap: 22 Euro plus p&p.
In the meantime, I found a very similar model as
Unomat B18 digi auto Flash at 18.99 Euro
with free shipping.
Flash units with built-in optical trigger
only require a "cold shoe" for mounting.
Canon Speedlites
Using a Canon DSLR, I also have "decent"
flash units to test with.
The Canon Speedlite 580EX II flash unit supports
manual auto mode with internal metering sensor
when C.Fn-05 ist set to "3".
Besides that, the Canon 550EX, 580EX and 580EX II
offer manual power settings from 1/1 down to 1/128.
While the old 550EX can only be adjusted in full stops,
the 580EX and 580EX II can be adjusted in 1/3 stops.
Unfortunately, the flash range indicator does not work
in M mode without EOS camera attached.
The 4 series flashes should work as well, all models
below don't have manual controls on the flash unit,
and therefore cannot be used.
The Canon 4 and 5 series flashes don't support
simple optical triggering,
so an external optical trigger is required. The
Seagull SYK-5 Flash Remote Controller
is an optical "hot-shoe"
flash trigger with adjustable pre-flash sequence delay
from 70ms to 1.5s. It can be securely mounted on a
1/4" thread to support the weight of a large
flash unit. Please note that the 580EX II
including batteries has a weight of about 520g, while
the camera has a weight of about 250g, including
battery and memory card.
In order to mechanically attach the flash unit to the
camera, a flash bracket that attaches to the tripod mount
is required. The aim is to get the flash head above the camera
right in the middle of both lenses. Because there is no
portrait orientation needed, a simple fixed flash bracket
will do the job.
Camera Geometry
The two cameras, 3D W1 and 3D W3, have a slightly different geometry.
These are the key measurements rounded to 0.5mm units:
|
3D W1 |
3D W3 |
| Height |
68.5mm |
66.0mm |
total |
| Stereo base |
77.0mm |
75.0mm |
distance |
| Left lens center |
14.0mm |
17.0mm |
from the edge |
| Tripod mount |
31.5mm |
31.5mm |
from the edge |
For building a bracket that should fit both models, there are some
points worth mentioning:
- The center of the lenses differs about 2mm in respect to the tripod mount.
- The height differs about 2.5mm.
- The 3D W1 has buttons near the left edge of the camera.
- The 3D W3 has the parallax adjustment lever at the top left of the camera.
- The height should be at least 72-75mm to leave room for the
mounting screw of the flash shoe.
With focus on the 3D W3, I decided to use a bracket design where the
stem is at the left side of the camera with a displacement towards
the rear of the camera. This leaves the parallax adjustment lever fully
operational.
To keep the first version at a low budget and easy to build, I
chose two steel L-plates and an aluminum pipe with a wooden core.
These are standard hardware store parts.
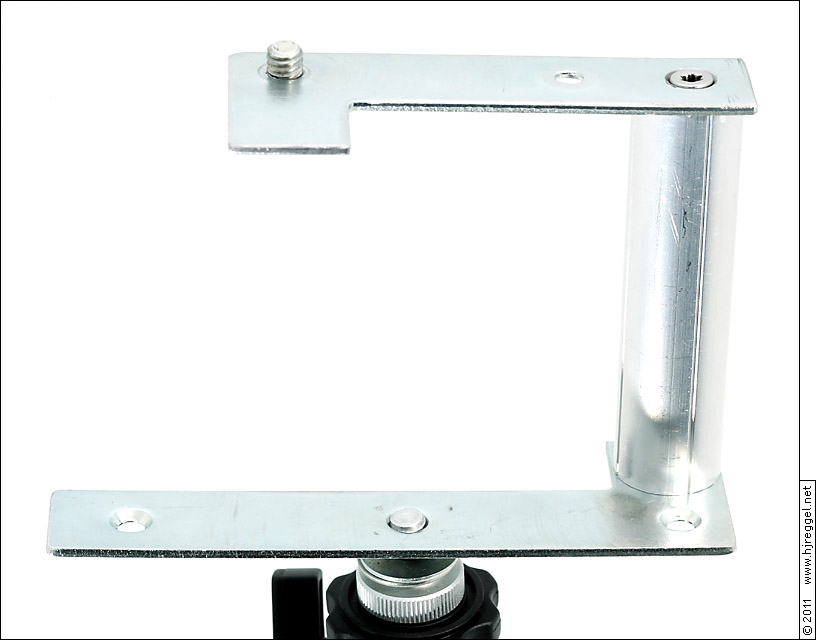 |
| Flash Bracket for the FujiFilm Real 3D W1/W3 Cameras | |
Parts list
- 2 flat L-plates, 120x120mm, 20mm wide, 2mm thick
- 1 piece of aluminum pipe, 19.5mm outer diameter, 1.5mm thickness
- 1 piece of riffled wooden rod, 16mm diameter
- 2 SPAX screws 4x40 (or similar)
- 2 1/4" screws (additional washers might be required depending on the length of the thread)
Building the bracket
The lower L-plate had to be trimmed at one side,
the upper L-plate needed to be trimmed at both ends.
The mounting screws are placed where the plates already had holes,
cutting a 1/4" thread there will keep the mounting
screws in place. For attaching the stem, two holes
were required.
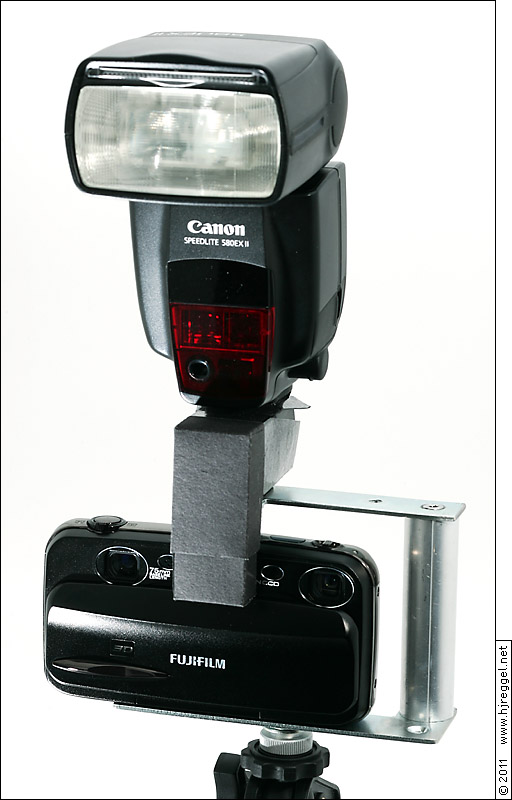
Below is the bracket with the FujiFilm Real 3D W3 camera
and Seagull SYK-5 flash trigger mounted.
 |
| Flash Bracket with the FujiFilm Real 3D W3 and Seagull SYK-5 optical trigger | |
Please note that the hot shoe is slightly
off-center towards the left lens, while
the internal flash is off-center towards the right lens.
Improvements
The plain setup works fine indoors in normal sized rooms.
For proper optical triggering, and to prevent triggering by
other flashes, a sealed light path from the internal flash
to the optical trigger has to be built.
Please note that the entry window must be large enough
because of the thermal power of the flash tube.
While I built the first prototype from thick white
paper, the following versions were built from thin matte black
cardboard. The second version was built to swing
out when the lens cover is closed, but for the final
version I opted for a matchbox-like drawer. It has to be pulled
out manually after opening the lens cover, but it will slide
back in when the lens cover is closed.
Another improvement is a rest from the upper part of the
bracket to the top of the camera. This is not shown on
the photos, but explains why the upper part of the
bracket has the angled piece towards the front of the camera.
Available Light versus Flash Photography
In available light photography,
there are three parameters for exposure:
Sensitivity, aperture and shutter time.
In flash photography, there is a small but important difference:
The flash is a short strobe of light.
The actual shutter time does not matter,
as long as it is in a certain range:
The shutter time can be as long
as the available light does not lead to correct or over-exposure.
Due to the triggering delay and the
flash duration (and with certain camera models
shutter curtain transitions),
there is a lower limit for the sutter
speed, called X-Sync time. Usually, the X-Sync time
is somewhere from 1/125s to 1/250s.
Within the range from available light exposure to the X-Sync limit,
the shutter time can be used to set the balance between
available light and flash.
Guide Numbers
The important parameter for a flash unit is the guide number.
This figure is a measure for the amount of the light, and is
equal to the aperture setting multiplied by the subject distance
at a given sensitivity, in general ISO 100.
Aperture and distance influence the light by
a power of two, while the sensitivity has a linear impact.
This means that the guide number has to be converted using the
square root of the ratio between two sensitivity values.
Example: A guide number of 10 at ISO 100 is equivalent to
14.1 at ISO 200, giving a range of 3.5m at F4.0.
Metering and Exposure Compensation
When using a flash unit with internal metering, sensitivity and
aperture settings must be matched up for camera and flash. The flash
unit detects the light reflected by the scene, and cuts off
the flash tube current, when correct exposure ist detected.
This can lead to underexposure when highly reflective
objects are in the scene, or if large and/or bright
objects are in front of the subject.
With the Canon 580EX II, sensitivity and aperture
can simply be dialed in. However, there is no exposure compensation
available. In case of wrong exposure, sensitivity or aperture settings
must be altered. To keep the aperture setting at the actual value,
the sensitivity setting can be lowered in case of under-exposure,
or raised in case of over-exposure.
Lack of Control
According to the slightly confusing specification sheet,
the Bilora flash has two
auto modes, A1 for F2.8 at ISO 100 and A2 for F5.6 at ISO 100.
If neither of these two modes gives proper exposure,
the only way to influence the flash output is to use
ND gel filters in front of the auto sensor. This will lower the
detected amount of light, and is therefore supposed to increase
the flash level accordingly.
In manual mode, the flash can only fire at full power,
with a claimed guide number of 22.
This would be the resulting flash range for GN 22:
| F3.7 | F4.2 | F5.0 | F5.6 | F8.0 | F9.0 |
| ISO 100 |
6.0m |
5.3m |
4.5m |
4.0m |
2.8m |
2.5m |
| ISO 200 |
8.5m |
7.5m |
6.3m |
5.6m |
4.0m |
3.5m |
Because the cheap Bilora/Unomat flash units have
no proper control over the flash output, I decided to
go for the big solution with Seagull SYK-5 trigger
and Canon 580EX II flash unit.
Once the SYK-5 setup works, it works remarkably well. Sometimes
there are problems with the initial setup where the flash
does not fire at all. I still did not
find out whether it is the hot shoe, the mode switch, or
something else.
Given the weight of the flash unit, a higher and
thicker stem with a little more distance to the side of the camera
would be more convenient.
Because the 4:3 format has a little more height than
the 3:2 format, a manual zoom setting of 28mm
is recommended for 35mm wide angle shots.
With GN 30 at ISO 100, and medium
aperture setting of f/5.0 or f/5.6, this gives a maximum
flash range of 5.4-6.0m.
At actual sensitivity/aperture setting, the photos are way
underexposed. In a normal environment, I had to lower the
sensitivity setting on the flash unit to ISO 40, raising
the exposure by 1 1/3. However, raising the exposure too much
is risky, due to the poor rendition of highlights
with entry level compact cameras.
I forgot to test the flash in manual mode, so I can't tell
whether the underexposure is due to wrong metering, or
a mismatch between the cameras ISO setting and the
flash output.
The white balance at daylight
setting is not perfect, but OK.
 |
|
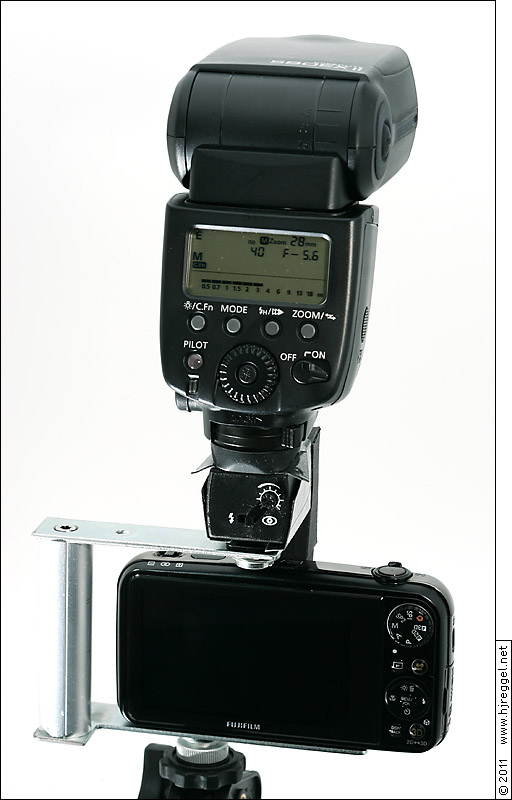 |
| Bracket, 3D W3, SYK-5 with shield, 580EX II - Front View | |
|
Bracket, 3D W3, SYK-5 with shield, 580EX II - Rear View | |
When I wanted to take some 3D photos using my standard
off-camera flash setup, I was just about to pull out my
radio triggers. But I decided to give
the Canon transmitter a try.
Canon ST-E2 Speedlite Transmitter
First, the slave flashes must be set up:
The Canon flash units will enter E-TTL mode
by default, whenever they are set to slave mode.
The mode button does not seem to work, but when it is
pressed for a longer time, the flash unit switches to
M mode with blinking M. The blinking should not give
cause for concern, it just seems to indicate the
non-standard setup.
The Canon ST-E2 Speedlite Transmitter
will automatically start in non-TTL mode
when no data communication is detected,
and fire the flashes in full manual mode
when triggered from the center pin of the
hot shoe. The weight of about 140g including
the 2CR5 6V Lithium battery does not get the camera
out of balance.
Standard Radio Triggers
Standard radio triggers should work, too.
But compared to the "native" wireless mode,
each slave flash unit will require a
receiver with additional batteries.
A popular and affordable solution are the
Yongnuo RF-602 radio triggers.
The transmitter (RF-602TX)
has a weight of about 35g including the
CR2 3V Lithium battery, each receiver
(RF-602RX)
has a weight of about 50g including two AAA batteries.
When I tested the Yongnuo RF-602TX on the Seagull SYK-5,
I noticed that this combination
does not work when the SYK-5 is
in pre-flash suppression mode. It does work in
instant triggering mode, but that does not
help with the FujiFilm 3D W1/W3 cameras.
The malfunction might be caused by the low
trigger voltage of about 3.2V of the Yongnuo transmitter,
where the Canon ST-E2 has about 3.7V,
and the Canon 5 series flash units have about 4.5V.
For me, the external flash is a "must-have" feature.
The prototype shown here works very well, but I
already have plans for a "proper" solution
made from solid aluminum with a different geometry that
allows full access to the battery door. With the
battery drain of the 3D W3 model, this is a
very important feature.
Benefits
- Enough flash power for using ISO 100 and/or F8.0/F9.0.
- Enough flash power for longer distances.
- No dust spots in the images.
- Reduced red-eye effect.
- Holding the bracket at the stem keeps the fingers of the left hand
off the left lens.
Drawbacks
- With the current design, the battery door is blocked, and the bracket has to be removed to get access.
Camera settings for flash photography (no ambient light)
- White balance set to daylight.
- ISO 100, 1/125s, F5.0/F5.6 at normal distance.
- ISO 100, 1/125s, F8.0/F9.0 at close distance.
Canon specific notes
- The Canon 580EX II is highly recommended due to its metering sensor.
- C.Fn-05 must be set to value 3 to activate auto metering mode.
- Flash zoomed to 28mm to cover the 35mm equivalent area of the 4:3 format at full wide angle.
- With the camera at ISO 100, a flash setting of ISO 40 gives good exposure (+ 1 1/3).
- The ST-E2 works fine with the slave flash units set to M mode.
- In manual mode, flash units with power adjustment in 1/3 stops are recommended,
due to the lack of fine control over sensitivity and aperture in the camera.
The second version of the bracket is still in the quick & dirty
setup, but works as intended. With a stem of
23.5mm diameter, 80mm height, and 18mm distance to the camera,
it is perfect to hold. A thin supporting bar that runs
between the display and the controls turns the bracket into a
solid frame. A special benefit of the new design
is the fully operational battery/card door.
The unreliable flash operation was due to three different issues,
and therefore very hard to track down:
The light path did not reflect enough light, so I added aluminum foil
at the inside.
The delay time of the SYK-5 must be set to the shortest possible setting.
When carrying the camera with a neck strap, the setting can get
mis-adjusted.
The biggest problem is the quick lock mechanism of the Canon
flash: The locking pin does not lock, not even when drilling a
full locking hole. The clamp itself is not strong enough,
the flash can slip backwards, so that the center
pin gets off the contact pad.
This means that after carrying the camera, the delay setting and
flash position must be checked.
Yesterday, I finally bought the new Canon 600EX-RT flash unit,
and can confirm that it works fine with the Seagull SYK-5 trigger.
The flash unit is 20-25g heavier than the 580EX II,
and more expensive, but the metering mode is much easier
to handle. Instead of entering the C.Fn settings, the
required metering mode "Ext.M"
can simply be set using the "MODE" button.
The function buttons are assigned to activate
Zoom, ISO and Aperture setting. After pressing the
appropriate button, the values can be set using the main dial.
Another benefit is the included filter holder with
two different orange filters to adjust the color
temperature to tungsten light.
» Seagull
offers several similar looking hot shoe flash triggers.
However, the SYK-5 (not listed on their website) is the only
suitable model from this series.
| Model |
Hot Shoe |
PC Sync |
Pre-Flash Mode |
| SYK-3 |
Standard |
No |
No |
| SYK-4 |
Standard |
Yes |
No |
| SYK-5 |
Standard |
Yes |
Yes |
| SYK-6 |
Minolta/SONY |
No |
No |
Seagull also offers different Shoe Mount adapters SC-0 to SC-8.
Minolta/SONY users should be able to find an appropriate adapter
for using the flash units on top of the SYK-5.